





This Servant of the Lake full game walkthrough contains puzzle solutions, item locations, and details on required interactions. If you’re stuck in Servant of the Lake, you’ll find the help you need here.
This walkthrough doesn’t cover the optional objectives that can be completed during each scenario, and instead focuses exclusively on how to efficiently reach the end of Servant of the Lake. However, you can replay every scenario after beating the game, making it easy to go back for missed achievements.
Servant of the Lake Walkthrough
Day 1: The Arrival
- Slide open the curtains and wait to arrive at the house.
- Click the carriage, open its door, and collect the tin cup.
- Click the planter to the left of the front door and click the carrot in the soil to collect it.
- Click the window above the planter, raise it, and click the tin cup inside.
- Click the window to the right of the front door, raise it, and drag the two cups you collected into the line of cups. Organize the cups by the number of lines on them, starting with the one-line cup on the left and ending with the five-line cup on the right. Match the following image if needed. Collect the coin that appears above the one-line cup.
- Give the coachman the coin. Give the horse the carrot.
- Click the iron bar on the ground after the coachman leaves.
- Use the iron bar on the board beneath the planter. Pry off the board and collect the key that is revealed.
- Click the front door and use the key on the keyhole. Click the inserted key and then the doorknob to enter the house.
- Click the maid and talk to her until she asks you to sign the contract. Click the crow feather she is holding to collect it.
- Click the small table to the right of the maid. Use the feather on the inkwell, then use it to sign your name on the contract.
- Click the maid to receive your journal. Open it to complete this scenario.
Day 1: Preparing Breakfast
- Click the door on the left to enter the servant’s room. The note on the table reveals Aldous’ favorite breakfast.
- Click the oats on the table and the wood on the chair to collect them.
- Open the stove and insert the wood into it.
- Leave the servant’s room, click on the door in front of you, and then click the door to the right of the cat. You’re now in the hallway.
- Click the crate to the left of the maid, and collect the bottle of milk inside.
- Click the door to the right of the maid. You’re now in the area outside Aldous’ room.
- Click the shelf and collect the small pot. Slide to the doors at the bottom of the shelf, and collect the dead mouse that is revealed.
- Return to the sitting room with the cat, and give the dead mouse to the cat. Click on the cat and collect the matches that are revealed.
- Return to the servant’s room. Use the matches on the wood you inserted into the stove. Put the small pot on top of the stove. Then put the oats and milk into the pot. Collect the small pot with porridge when it is ready.
- Return to the area outside Aldous’ room. The door to the left of the shelf is now open. Click on the door to enter Aldous’ room.
Day 1: Waking Up Aldous
- Click on the small table on the left side of the room and collect the bowl.
There is a note on the table that reveals Aldous’ morning routine.
- Drag the bed curtain to the left to reveal Aldous.
- Click the dresser to the left of the table. Click the clock hand the soldier is holding to collect it.
Clicking the soldier will reveal the pattern that is used for Aldous’ exercise later in the scenario.
- Add the clock hand onto the clock and set it to 7 o’clock, the time indicated in the note on the table. It will ring and wake up Aldous.
- Open the second and third dresser drawers. Collect the spoon and slipper from them.
- Collect the other slipper from the floor, and then click on the puzzle box on the ground.
Aldous Room Puzzle Box
To solve the puzzle box, you need to move the four colored tiles to the positions shown on the box. You can move tiles by sliding them into the openings on the circle, and then rotating the circle. Here is a simple way to address this puzzle:
- Slide one of the colored tiles into an opening in the circle.
- Locate that tile’s correct position.
- Rotate the circle so that the circle’s empty slot is at the tile’s correct position, and slide out the tile that is blocking it.
- Rotate the circle so that you can insert the correct tile into its position.
- Repeat these steps for the remaining three positions.
You’ll get a razor when you open the puzzle box, and you can now continue through the scenario:
- Click Aldous and use the razor to shave his face. Collect the earlobe from his shoulder after you’ve cut it off.
- Open the window above the dresser, and give the earlobe to the crow. Collect the key from its nest when the bird flies away.
- Use the key to open the top dresser drawer. Collect the berries that are inside.
- Click the hanging clothes on the right side of the room. Move the pants on the bottom rung and collect the cloth that is revealed.
- Use the cloth on Aldous’ ear. Give Aldous the bowl. Put the small pot with porridge into the bowl. Put the berries into the bowl. Click on the bowl when Aldous says it’s not how he likes his porridge.
- Watch what holes the bug goes into. Move the berries to block those holes. Click on the bug to squash it when it stops moving.
- Put the spoon in the bowl and move it to Aldous’ mouth to feed him.
- Click Aldous when he is standing next to the clothes. Click him so he bends in this pattern, as indicated by the toy soldier: left, right, down, right, right, down.
- Put the clothes on Aldous, including the slippers.
- Click the window and then the carriage in the distance to complete the scenario.
Day 1: Preparing the Reception
- Click the door on the left to enter the servant’s room. Collect the candle on the table.
- Go to the hallway where you previously found the maid. Talk to her.
- You must now use your cloth to clean debris on the floors in three locations: in front of the shelf where you found the dead mouse, in the entryway where you signed the contract, by the chair in the servant’s room.
- Return to the maid and collect the feather duster. Use it to clean the three portraits, two in the sitting room and one in the entryway.
Clicking on the cleaned paintings will cause them to move, revealing a code you will use later in the scenario.
- Return to the maid to get a second candle.
- Click the door to the right of the maid to return to the area outside Aldous’ room. Slide the doors on the bottom of the shelf to reveal a box. Enter the code 243 into the box to open it and gain access to a third candle. Those numbers correspond with how many moves the corresponding people in the paintings make.
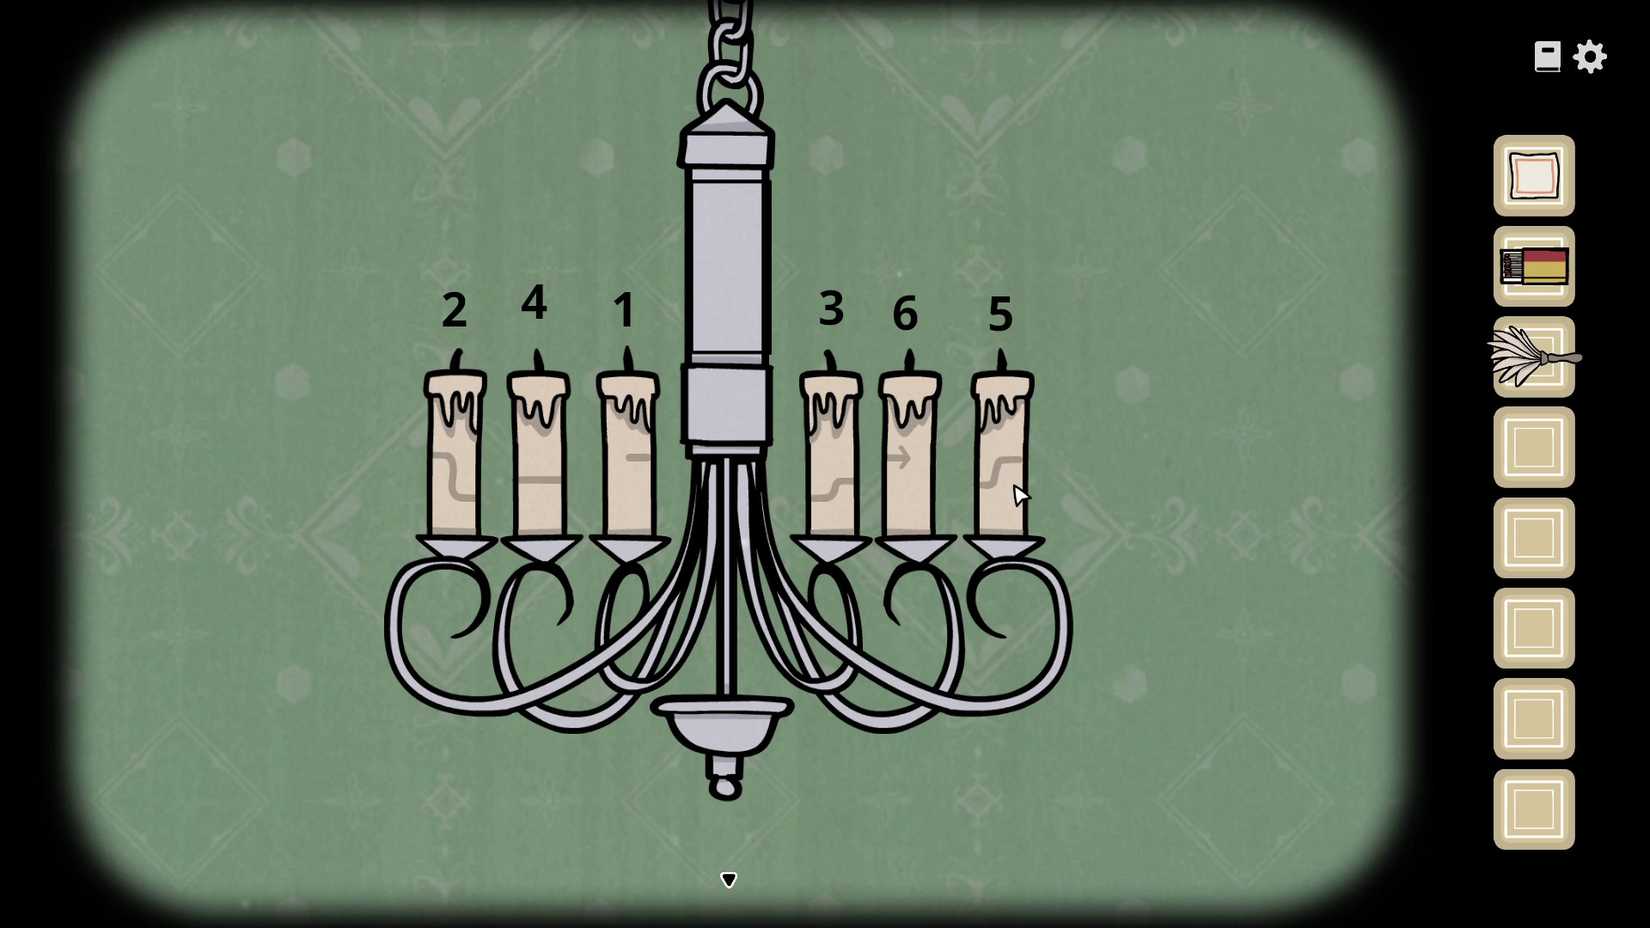
- Go to the entryway, click the chandelier, and insert the candles into the empty slots. Look at the lines on the candles. Determine how the candles would need to be arranged so that line creates a continuous path. Use your matches to light the candles in that order. Check the following image if you are confused.

- Return to the maid to end the scenario.
Day 1: Welcoming the Guests
- Click the milk jug on the ground to collect it.
- Click the goat and then its udders. Use the milk jug to collect its milk. Collect the small key from the hole the goat makes.
- Click the rocks and log to the right of where the goat was standing to start the cockroach puzzle.
Cockroach Puzzle
You solve this puzzle by sending the cockroaches into the hole. You can force cockroaches to move by placing the small white rock next to them, though you have to be careful that they do not get stuck. You can reset the puzzle by clicking the circular arrow on the right side of the screen, and you can use the following image and sequence if you’re stuck:

Put the small white rock in the squares in this order: 1C > 1D > 2C > 4D > 4C > 1D > 2D > 3F > 3E > 2C > 3D > 4D > 4C > 7D > 6D > 5D > 3E > 2C > 4D > 4C > 8F > 7F > 8D > 7D > 6D > 5D > 3E > 2C > 4D > 4C > 6G > 6F > 7D > 6D > 5D > 3E > 2C > 4D > 4C > 6E > 5E > 3F > 3E > 2C > 4D > 4C
When the final cockroach goes into the hole, collect the stone tablet that is revealed and continue.
- Click the mailbox on the right side of the area and use the small key to open it. Collect the stone tablet that is inside.
The letter in the mailbox tells you everything you need to do to complete the scenario.
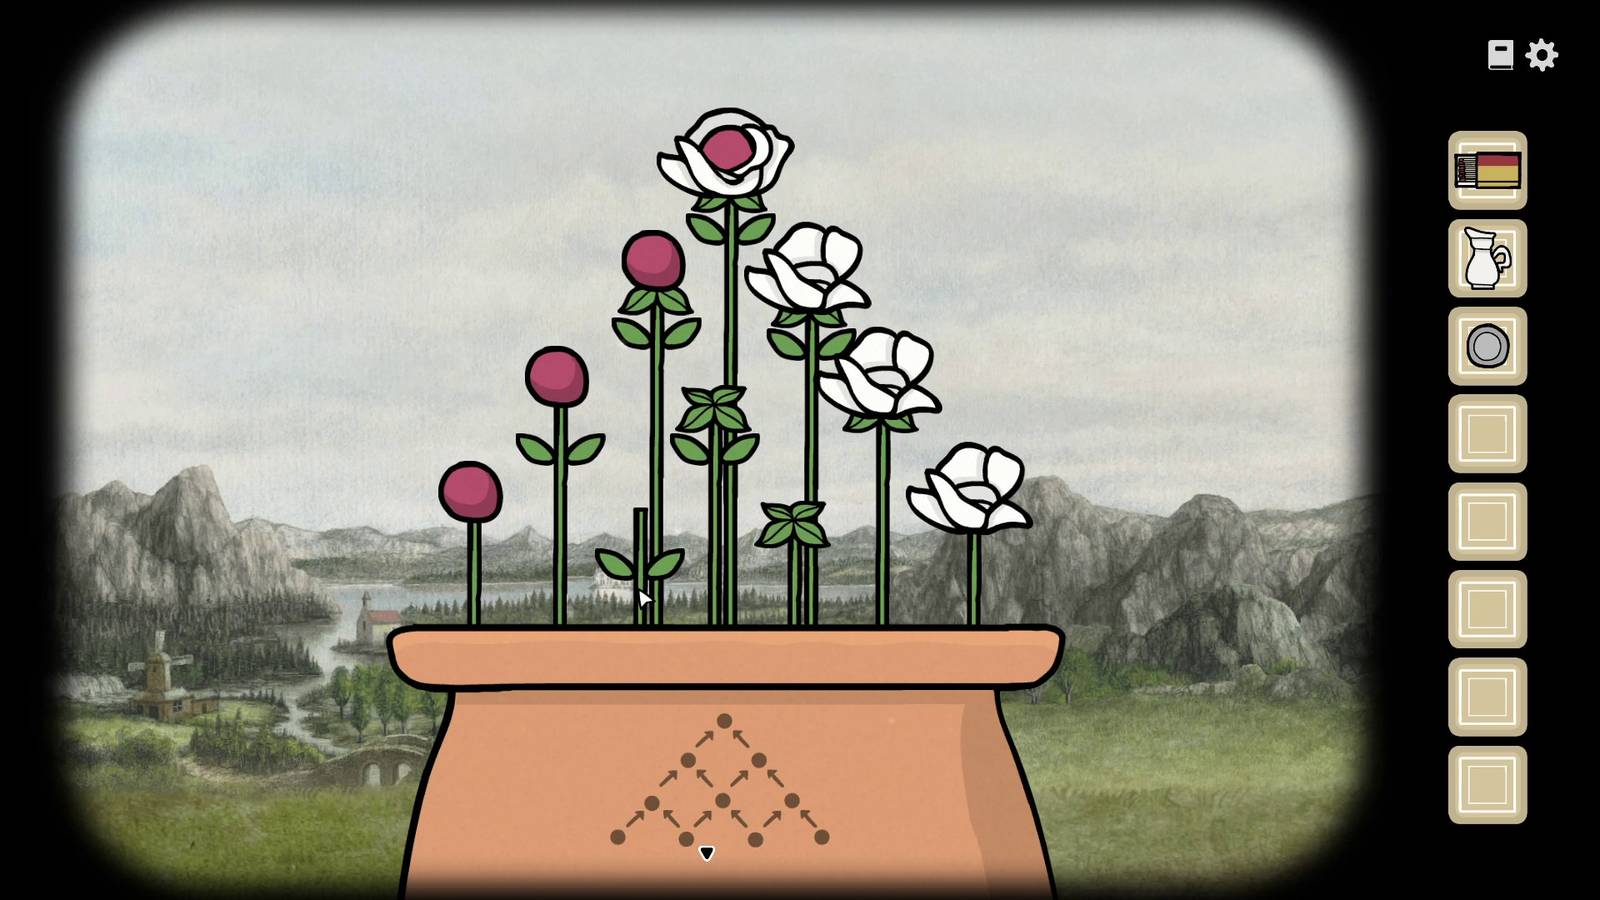
- Click the flower pot on the left side of the area. Arrange the flowers to match the following image, then collect them and the stone tablet that is revealed.

- Click the puzzle box to the right of the flower box, next to the columns.
- Insert the three stone tablets you collected into the empty spaces.
- Arrange the tablets as follows to open the box and collect the flag: tree > nest > egg > bird | house > wardrobe > vial > drop. Match this image if needed:

- Click the flag pole. Put the flag on it and raise the flag to get the carriage in the distance moving.
- Click the basket and the suitcase on the back of the carriage when it arrives. Then open the carriage’s curtain and help Alexandra out of it.
- Click the basket and open it to reveal the baby. You can move the basket around to see a code written behind the baby: 374.
- Enter that code into the suitcase’s right lock and click on the square to open it. Organize the clothes inside the suitcase so that they perfectly fit to open the wallet. Match the following image if needed. Collect the coin, which you should give to the coachman, and the bill, which you should give to the horse.

- Give Alexandra the flowers you collected, talk to the coachman, and talk to Alexandra once more to complete the scenario.
Day 1: Serving Tea
- Repeatedly click the cat in the entryway until it spits out the sticky substance. Collect it.
- Go to the servant’s room. Talk to the maid and take the sugar from her. Take the tea from the table. Take the kettle with hot water from the stove.
- Go to the area with Aldous’ room. Take the tea cup from the shelf.
- Go to the hallway. Give Alexandra the tea cup. Put the tea, milk, and hot water into it. She’ll drop the cup.
- Use the image below to realign the broken teacup. Use the sticky substance on the cup to fix it.

- Give Alexandra the repaired teacup. Put the tea, milk, and hot water into it. Put two shakes of sugar into the cup.
- Enter the living room (the door on the left side of the hallway).
Day 1: Opening the Reunion
- Click the china cabinet on the right side of the room. Take the glass from the top shelf.
- Click the box on the top shelf. Rotate the squares to recreate the date shown on the note, then take the bottle of champagne. Match the following image if needed.

- Give the glass to Aldous. Fill it with champagne.
- Open the window on the left side of the room. Let William in to send him to the chair. Give him the bottle of champagne.
- Align the broken bottle to get the code that is used to open the second box in the china cabinet and collect the cigar. The combination is top-left, top-middle, middle, middle-right, bottom-middle, bottom-right. Use the image below if needed.
- Give William the cigar. Light it and repeatedly click on the man’s mouth so he eats the cigar.
- Put out the fire in William’s mouth. The left and right teeth move the saliva drop in the corresponding direction, and the middle tooth causes the drop to occur. Take the spoon.
- Return to the china cabinet and solve the tree puzzle on the top shelf. Here’s how it is solved:
Tree Puzzle
The goal is to send the insect through the tree so that it emerges from each of the six flowers. You can adjust the arrows in the bottom-right corner to determine which path the insect takes at each fork, and you can click on the insect to send it along the set path. Here are the arrow alignments for all six paths:
- Right, right, right, right
- Right, left, left, left
- Right, right, left, left
- Left, left, left, right
- Left, left, right, left
- Left, right, right, left
After the insect has taken all six paths, you should collect the fly eggs.
- Take the wood under the window. Put the wood in the fireplace and use the matches to light it.
- Click the painting above the fireplace. Click the objects in the order indicated on the placard (timepiece, book, elixir, fish) to get the fish.
- Put the fish on the fire. Take the grilled fish when it is done.
- Put the grilled fish on the table on the right side of the room. Put the fly eggs on top. Collect the three fish on toast pieces and serve them to all three characters.
- Hit Aldous’ glass with the spoon to start his speech.
- When the baby starts crying, click on him and perform the actions Alexandra indicates: click the baby’s eye (close your eyes), raise the moon (make the moon rise), click the baby’s body (sacrifice I hold), click the woman’s ring (jewel of gold), click the woman’s pendant (my gem of a child), click the woman’s mouth (last time I smiled), click the cloud (clouds drifting by), click the woman’s eye (make your mother cry).
- Return to Aldous to continue the speech.
- Wake up William by clicking on the object his eye looks at when it opens: up = hat, down = tie, right = ear.
- Return to Aldous to complete the speech and the scenario.
Day 1: The Night Watch
In this scenario, you must look for abnormalities in the house. If you find one, ring the maid’s bell. If everything is normal, blow out one of the maid’s candles. The scenario is complete when you blow out all three candles, and here are the abnormalities to look for:
- Aldous’ door is open.
- The door at the top of the stairs in the sitting room is open.
- The man in the painting at the top of the stairs is low.
- The cat isn’t on the chair in the sitting room.
- The woman in the painting at the bottom of the stairs has a black face.
After blowing out the candles, go to the hallway and talk to William to get the walking stick. Use it on the ceiling outside Aldous’ room to get into the attic and complete the scenario.
Day 1: Searching the Attic
- Collect the rung and small statue from the dresser drawers.
- Click the window and use the clouds to solve the puzzle box in the bottom-left corner of the room. Here is how this puzzle works:
Cloud Puzzle

You can move the clouds left and right. When the clouds are in certain positions, the lake will turn black, the moon will turn red, and the house will glow. When one of those things occurs, the stars that are visible create the constellation that should be replicated on the puzzle box. The image above shows the correct combination. You get a small statue from the box.
- Click the organizer on the table.
- Organize all the objects so that they fit perfectly. The following image shows the proper organization. Collect the candle.

- Insert the candle into the lantern above the puzzle box and use your matches to light it.
- Take the small statue on the ground to the left.
- Click on the box next to the small statue and solve the figurine puzzle inside. Here’s how it works:
Figurine Puzzle
You solve this puzzle by putting figurines that match the instructions on the piece of paper on to that piece of paper:
- There was a young man named Vanderboom. A soldier wearing blue.
- He married a young woman. A soldier wearing blue + the woman.
- He built a house by himself. A soldier wearing blue + the square and triangle made into a house.
- Three children were born, two boys and a girl. Both soldiers wearing blue + the woman.
- He went to war on his horse. A soldier wearing blue + the horse.
- He was shot in the back and died. The soldier with the gun pointed at a soldier wearing blue.
- The mother went up to the mountain. The woman + the triangle.
- The last thing she saw was a large cube. The woman + the square.
You can now open the square and get a small key.
- Use the small key to open the purse next to the dresser. Take the small statue inside.
- Insert the small statues into the golden box on the dresser. Move the statues so that they match the symbols above. From left to right: insect, bird, monkey, fish, goat. Take the special scroll and rung.

- Insert the rungs into the ladder on the right side of the room.
- Slide open the panel at the top of the ladder to complete the scenario.
Day 2: Preparing Coffee
- Talk to the maid.
- Go through the door at the top of the stairs in the sitting room.
- Click the painting of the house. This painting is used to open the box on the table in the servant’s room. Here’s how it works:
House Painting Puzzle

Clicking the windows in the house painting will cause them to illuminate, revealing numbers and silhouettes of the three family members. It also causes the three portraits of the family members to reappear, and you will see that they are all pointing in a direction: Aldous points right, Alexandra points up, and William points left.
Now, find the silhouette of each family member in the house painting, and look in the direction that they are pointing in their respective portraits. The numbers they are pointing to are the digits used to open the box in the servant’s room: 315. You’ll get some coffee beans when you open that box.
- Insert the coffee beans into the grinder beneath the house painting and turn the crank to get ground coffee.
- Put the ground coffee in the pot on top of the stove in the servant’s room to get a coffee pot.
- Click the door that leads to the hallway and fill Aldous’ cup with coffee.
- Return to the house painting and talk to the maid.
- Enter William’s room (the door on the left) to complete the scenario.
Day 2: Waking Up William
- Get the seed on the ground underneath the bird cage. Insert it into the pot on the table.
- Get the spoon on the table by William.
- Open the closet on the left side of the room. Take the hat and look at the pocket watch in the coat. It reads 9 o’clock.
- Move the hands on the grandfather clock in the room to 9 o’clock. Open the body of the grandfather clock and click the box inside.
- Move the objects in the box so that they are in the positions shown in the family portrait above William: top-left = gem, top-right = pipe, bottom-left = skull, bottom-middle = sock, bottom-right = chalice. Collect the chalice.

- Click William’s mouth and use the chalice to collect his drool. Pour the coffee into his mouth.
- Pour the drool onto the seed in the pot. Click the flower that grows and collect the bird seed.
- Give the bird seed to the bird and collect the feather. Use the feather to tickle William’s feet. Here’s how this puzzle works:
William’s Foot Puzzle
When you use the feather on one of William’s toes, it will twitch in a direction some number of times. This indicates the next toe you are supposed to tickle. For example, if you click the middle toe, and it twitches upward twice, you must tickle the big toe (two toes up) next. Repeat this process until the small key falls on the ground.
- Use the small key to open the box next to the pot. Collect the eye drops and the knob inside.
- Put the eye drops into William’s eyes to wake him up. Put the hat on William.
- Go to the window on the right side of the room. Use the knob to open it. Use the chalice to collect the rain.
- Pour the rain onto the plant. Click the plant that grows and collect more bird seed.
- Give the bird seed to the bird and collect the egg.
- Put the egg into William’s hand and break it with the spoon.
- Put the special scroll on the table by William. Rotate it to create a fish. Match the following image if needed.

You must now move the paper with the images so that William points at them in the order indicated by the story. Here is the correct order, and you should talk to William at the end to complete the scenario:
- House
- Hill
- Door
- Pocket watches
- Book
- Bottle
- Silhouette with halo.
Day 2: Cleaning the Floors
- Go to the house painting. Collect the scrubber from the case on the table.
- Use the scrubber to clean the floor in the following locations: beneath the house painting, in the servant’s room, in the hallway by the balcony (door to the right of the maid). The floor beneath the house painting is cleaned by interacting with the spots in the order of the number of dots on them (one through six). The floor in the servant’s room is cleaned by interacting with the spots based on the size of the dots, starting with the smallest one-dot spot and ending with the largest two-dot spot. The floor by the balcony is cleaned by interacting with the spots in the order indicated by the directions the dots are pointing.

After cleaning all the floors, talk to the maid by the balcony, click the bathroom door on the right, and look through the keyhole. Now go onto the balcony and click Aldous’ silhouette in the yard to complete the scenario.
Day 2: Going Hunting
- Take the rifle from Aldous.
- Click the tree stump, take the bullets, and put the rifle on the stump. To shoot the rifle, insert a bullet into it and then click it again. You can aim the rifle by dragging around in the areas outside it, and you need to shoot the following: deer (scare away William by the water to make it appear), pheasant (in a tree to the right), rabbit (shoot the rock to the right of the water to make it appear), pigeon (flying through the air), boar (peeking out behind a tree near the road to the left of the bridge).
- After shooting, click the note that falls on the ground to learn how to complete the meat puzzle.
Meat Puzzle

The meat puzzle is used to get the code for the shack and retrieve Aldous’ butcher knife. To solve it, you need to move around the body parts (eye, nose, talon, tongue, ear), and see what numbers they respond to. Those numbers are the digits for the shack lock, and the order is indicated in the note: sight, smell, touch, taste, hearing. The code that is revealed is 91276.
- Take the butcher knife and the cloth from the shack.
- Give the butcher knife to Aldous. Make him chop until blood covers his eyes. Open his satchel when he can’t see to get the silver timepiece. Use the cloth to clean his face and complete the scenario.
Day 2: Doing the Washing
Start by collecting dirty clothes in the following locations:
- Guest room (door left of house painting).
- Servant’s room (one on table, three on the floor). Take the baby as well.
- Entryway (one on table).
Now give the baby to the maid by the house painting to get one final piece of dirty clothing. Put all seven pieces into the tub on top of the stove in the servant’s room.
- Take the tub.
- Go to the balcony upstairs. Use the tub on the clothesline to hang the clothes. Arrange the clothes based on how many stripes they have, starting with zero stripes and ending with six stripes. Take the key from the pocket of the shirt on the left and use it to open the bathroom door to the right of the balcony.

Day 2: Helping with Bathing
- Use the tub to fill the bath.
- Click the bench to the right of the bath and take the cookie. Click the box on the bench and solve the sliding symbol puzzle to get soap. Here’s how it works:
Sliding Symbol Puzzle
To solve this puzzle, you must make the sliding silver pieces stop on top of the spaces with the matching symbols. Since you cannot reset this puzzle, a single solution will not be helpful to readers who have already made some moves. As such, here is a strategy that should be useful to anyone stuck on the puzzle:
- Get the teardrop piece to the top-left corner of the board. Put a second piece in the top-right corner. Push the teardrop piece to the right. It’s now in column four. Put the other four pieces in the bottom row and push the teardrop piece down into position.
- Get the circle piece in the top-left corner. Put a second piece in the top-right corner. Push the circle piece right and then down. It’s now on top of the teardrop piece. Push the circle piece left. Now, get a third piece on top of the teardrop piece, using the same strategy used to get the circle piece there. You can then push the circle piece right into position.
- Get the four-point piece into the top right corner. Put the other two pieces in a row in the top-left corner. Push the four-point piece left and then down. It’s now on top of the circle piece. Push the piece in the top-left corner down. Push the piece in the first row, second column left to the top-left corner. Push the piece in the bottom-left corner up. Push the four-point piece left into position.
- Put the remaining two pieces into position.
You can now add the soap to the bath.
- Take off Alexandra’s hat and collect the hair pin.
- Put the hat on the rack on the left side of the room. Take the note that is inside the hat.
- Click the tiles above the bathtub and solve the puzzle by clicking tiles that create groups of four like items: four plants, four people, four animals, four body parts, four pieces of furniture, four objects. Take the scissors.
- Use the scissors to cut the stitches on Alexandra’s back. Take the maggot.
- Click the hole under the bench and use the cookie to lure the mouse. Kill the mouse with the hairpin when it is out of its hole. Insert the maggot into the mouse. Take the bone comb.
- Use the bone comb to brush Alexandra’s hair. Unbutton her dress.
- Click Alexandra in the bath and solve the bubble puzzle. Clicking a bubble will send it in the direction the dot on it is pointing, and the goal is to create a chain that pops all bubbles. First puzzle = bubble on right. Second puzzle = bubble in top-left corner. Third puzzle = bubble above bubble with no dot. Fourth puzzle = bubble below bubble with no dot.
- Move the hand that appears and use the scissors to take Alexandra’s pendant when she closes her eyes.
- Take the note from the dress on the rack. Place all the notes on the table beneath the window. The notes are used to get the combination for the suitcase. The X’s on two of the notes indicate the positions of the numbers on the third note that are not part of the combination. This leaves 281, and you should press the button to the left of the combination after you enter it.

- Put the pendant into the box you get from the suitcase and take the bronze timepiece to complete the scenario.
Day 2: Nighttime Duties
- Talk to William in the servant’s room. Take the golden timepiece.
- Use the timepieces on the corresponding portraits to get the symbols that are used to solve the bottle puzzle in the cellar.
- Click the rug in the sitting room, enter the cellar, and solve the bottle puzzle:
Bottle Puzzle

To solve the bottle puzzle, you must put each bottle on top of the correct symbol. You find those symbols, by using the timepieces on the portraits (silver on Aldous’, bronze on Alexandra’s, and golden on William’s). The solution is as follows:
- Bottle with golden band = s-like symbol.
- Bottle with silver band = triangle with horizontal line symbol.
- Bottle with bronze band = upside-down cross symbol.
After putting the bottles in the right positions, click the barrel that opens to complete the scenario.
Day 2: Inspecting the Cellar
To complete this scenario, you must discover the times shown on three clocks. Here’s how that is done:
Human Head Clock
- Pick any three objects from the case to open the gate.
- Click on the silhouette of the clock in the next room. It reads 5 o’clock. Click it again to restart.
Bird Head Clock
- Take the spade, magnet, and matches from the case to open the gate.
- Go through the door on the left side of the next room.
- Use the spade on the pile of dirt to reveal a box. Use the magnet on the hole to get the key. Use the key to open the box and get a torch. Put the torch in the holder on the left side of the room. Light it with the matches.
- Pass through the door on the left and follow the path to the bird head clock. It reads 8 o’clock. Click it to restart.
Cube Head Clock
- Take the empty bottle, sledgehammer, and matches from the case to open the gate.
- Enter the room to the left of the human head clock.
- Use the sledgehammer on the barrel. Use the empty bottle on the oil to collect it. Use the matches on the oil to blow up the wall.
- In the next room, pour the bottle with oil into the hole in the rock. Drop a match into the hole to blow up the wall.
- Advance to the cube head clock. It reads 10 o’clock. Click it to restart.
You now have what you need to complete the scenario:
- Take the sledgehammer, hook, and weight from the case to open the gate.
- Enter the room to the right of the human head clock.
- Put the hook on the ring hanging from the ceiling, and put the weight on the hook to open the gate.
- In the next room, hit the pillar on the left to create a bridge you can use to move forward.
- In the room with the statues, put the three timepieces around their necks. Set them to the times you’ve learned: human head = 5 o’clock, bird head = 8 o’clock, cube head = 10 o’clock.
- Pass through the door that opens. Collect the book. Give the book to Aldous to complete the scenario.
Day 3: Looking for the Cat
- Talk to the maid.
- Go to the door at the top of the stairs in the sitting room and talk to William. Give him the sledgehammer.
- Go through the door on the right side of the sitting room. Take the pebble sitting on top of the statue. Go through the doorway on the left side of the room.
- Open the window. Use the pebble on the cat’s tail.
- Go to the sitting room. Click the cat under the chair.
- Go back to the statue. Click the cat behind it.
- Go to the sitting room. Click the door to the hallway to see William
- Go to the servant’s room. Open the stove to find the cat. Talk to the maid. Read the note on the table. It reveals the solution to the next puzzle.
- Go to the room with the statue. Click on the painting. Click on the items in the order indicated in the note: hat, rifle, bear, crow. Click the opening beneath the painting to complete the scenario.
Day 3: Assisting in Alchemy

The first step to completing this scenario is figuring out what all the symbols mean and sorting them on the board. The image above shows the proper sorting, and it is determined by interacting with all the objects in the room.
When everything is sorted, do the following to create the elixir. Some of these steps you’ll have completed while working to determine the meaning of the symbols.
- Collect the two bottles from the crate on the right side of the room. One is filled with water and the other is empty.
- Put five drops of water into the bird’s dish and click the bird. Collect the egg that falls.
- Click the box on the floor. Use this pattern to open the box and get matches: left, left, right, right, left, right.
- Enter 2451 into the combination below the juicer. Collect the three empty bottles.
- Use the matches to light the candle next to the book that shows the elixir recipe.
- Click the silhouette of the device in the backroom.
- Put an empty bottle under its spout. Press the left value twice and the middle valve three times. Press the valve above the spout to fill the bottle with oil.
- Put an empty bottle under its spout. Press the right valve four times and the left valve once. Press the valve above the spout to fill the bottle with acid.
- Put acid into Aldous’ cup. Take the meat from his tongue.
- Go to the juicer. Put the meat into it. Put an empty bottle under its spout. Pull the lever four times to fill the bottle with blood.
- Go to the plant in the pot. Put in four drops of water and one drop of blood. Take the strange fruit.
- Put the strange fruit into the juicer and pull the lever four times to fill an empty bottle with juice.
- Go to the table with the elixir recipe. Put the egg in the bottle. Put one drop of juice in the bottle. Put one drop of acid in the bottle. Put one drop of oil in the bottle. Put three drops of blood in the bottle. Take the elixir.
- Put the elixir in Aldous’ glass. Click on the crow. Give Aldous the bottle to complete the scenario.
Day 3: Unforeseen Maintenance
- Go to the servant’s room. Repeatedly click the cat to get sticky substance. Take the statue head on top of the stove.
- Go to the entryway. Take the chair part on the table.
- Go to the sitting room. Take the chair part on the pink chair. Talk to the maid under the stairs.
- Go to the room with the statue. Put sticky substance on top. Put the statue head on top. Go through the doorway on the left. Take the balcony piece. Look out the window to see William.
- Go to the servant’s room. Use the sticky substance and two chair parts to repair the chair. Put the stove cover on the stove.
- Use the sticky substance to fix the three portraits of the family members.
- Go to the sitting room. Put the balcony piece on the balcony.
- Return to the servant’s room and talk to the maid.
- Go to the kitchen (the door next to the statue) to complete the scenario.
Day 3: Preparing Dinner
- Take the wood from the floor.
- Take the knife from the maid.
- Open the oil cabinet on the wall. Transfer materials between the vessels so that each one is filled with a single color and earn a bottle with oil. Take the tomato from the cabinet.
- Click the cake on the left side of the room. Cover all the holes with toppings to collect a piece of the cake. Match the following image if needed.

- Take the onion, raw potatoes, and shrimp from the cabinet on the right side of the room.
- Click the cutting board beneath the oil cabinet. Use the knife to cut the onion, tomato, and shrimp.
- Open the window. Talk to William and take the mushroom.
- Insert the wood into the bottom of the stove and use the matches to light it. Insert the raw potatoes into the top of the stove to bake them. Put the oil, onion, tomato, shrimp, and mushroom into the pot on top of the stove.
- Ring the maid’s bell to summon Aldous.
- Give Aldous the potatoes. They look like his face. Start by feeding him the one without any abnormalities. Watch how his face changes and feed him the corresponding potato. Repeat this process until he’s eaten all of them. Feed him the cake. Take his spoon.
- Use the spoon on the soup. Give the filled spoon to Aldous, then click on the spoon to eat it.
- In the next sequence, click on the silhouettes of the characters as they speak and follow their instructions. This leads to the end of the scenario.
Day 3: Dressing Up for Dinner
- Take the glass on the table in the entryway.
- Go to the sitting room. Get the tie from the chair. Go through the floor into the cellar.
- Take the glass from the shelf. Open the box on the floor by rotating the squares to create the date shown on the note. Take the bottle of wine.

- Go to the servant’s room. Put the two glasses on the maid’s tray. Fill the three glasses with wine.
- Go to the hallway. Take the hair ribbon from the crate.
- Go to the area outside Aldous’ room. Talk to him to find out how to collect the rifle.
- Go to the room with the statue. Click the painting. Click the hat twice and the crow once. Take the rifle. Click the statue and take the bow tie near the base. Go back to Aldous and give him both items.
- Go through the door at the top of the stairs in the sitting room. Open the box on the table to get a necklace.
- Click the door to the left of the table and talk to William to learn about a hidden object. It’s a revolver, which is retrieved by clicking on the fifth stair in the sitting room. Give the revolver and the tie to William.
- Click on the painting of the house. Clicking on a figure in a window will cause it to move to the open window. You must get the family members into positions that correspond with the positions of the paintings in the house: the right-most window on the second floor and the two left windows on the first floor. You can match the following image if needed.

- Check each painting to reveal a symbol. Put the bottles in the cellar on the corresponding symbol: bronze = s symbol, silver = spiral symbol, golden = triangle with vertical line symbol. Open the box that appears and take the sacred cloth and sacred water.

- Go to the hallway with the balcony and take the baby from Alexandra. Put it in the basket on the floor. Put the sacred cloth and sacred water on the baby.
- Give the necklace and hair ribbon to Alexandra.
- Go to the dining room, which is in the room past the statue, to complete the scenario.
Day 3: Serving Dinner
- Take the bottle of red wine next to Aldous. Use it to fill his glass and start his speech.
- Take the plate of appetizers from the maid. Put them on the table. Serve them so that they follow the rules set by the note: broccoli + ring = left plate, ear + bread = middle plate, fish head + bacon = right plate. Fill up all the wine glasses.
- Click William to start his song. Click the notes so they fall into his wine glass. Single notes fall directly down. Double notes fall slightly in the direction of the lowest note.
- Take the plate with the main dish from the maid. Put it on the table. Serve so that the food follows the rules set by the note: broccoli + potato = left plate, 2x chicken + carrot = middle plate, chicken + carrot + broccoli + potato = right plate.
- Mirror Alexandra on the harp. For example, when she hits the highest note, you hit the lowest one.
- Take the plate with dessert from the maid. Put it on the table. Serve so that the food follows the rules set by the note: 2x cheese = left plate, brown circle = top plate, 3x white = right plate.
- Click Aldous to start the speech. Click William when Aldous says he is looking at him.
- Take the knife from the floor by William. Use it to cut the rope in the top-left corner to drop the chandelier and complete the scenario.

Day 3: The Departure
- Talk to Aldous. Remove the fork from his shoulder.
- Talk to William until he tells you to give Aldous something to drink. Remove the broken glass from his shoulder.
- Put the broken glass under the water drop in front of the bars. Give the filled glass to Aldous. Take the cloth.
- Check Aldous’ leg. Move up his pant leg and click the three wounds to fill them.
- Insert the cloth into the wound on William’s right side. Use the fork to remove the small piece of meat from the wound on his left side.
- Give the meat to the cat behind the bars. Take the hair pin from the cat.
- Insert the hair pin into the lock on the bars. Rotate it until one of the screws starts rapidly vibrating. Hold the hair pin in that position until it falls out. Repeat this process for the other three screws. Move the mechanism inside the lock to open the gate.
- Follow the path until you reach the room with a torch. Backtrack one room and take the flint on the ground on the left. Use the flint on the torch to light it. Look at the head on the floor (marked with a three), and continue along the path.
- Collect the board along the way, and use it to get over a gap. Look for the cube (marked with a five) and the bird head (marked with an eight) as you proceed.
- When you reach the room with the statues, set the clocks to the times indicated on the heads: left clock = 3 o’clock, middle clock = 8 o’clock, right clock = 5 o’clock.
- Continue through the opening and interact with the masked figure. Take the baby.
- Give the baby to the coachman. Get into the coach to complete the game.




- Released
-
August 13, 2026
- Developer(s)
-
Rusty Lake
- Publisher(s)
-
Rusty Lake
- Number of Players
-
Single-player
- Steam Deck Compatibility
-
Verified